✠ Diablo II — Season 14 ✠ Reign of the Warlock
◆ ◇ ◆ ◇ ◆
Two-player progression · Sorceress + Warlock + Smiter alt · Patch 3.2
❄ Sorc
☥ Lock
✦ Smiter
⚔ Party
↻ repeatable
Overall
0 / 0
Phase 1 · Playthrough Hints
Normal → NM → Hell is freeform. These are the things that are easy to miss and expensive to redo.
Mule to the alt
Cube the Horadric Staff (A2), then mule it to the alt saves re-running Maggot Lair + Claw Viper Temple on every later character
Cube Khalim's Will (A3), then mule it to the alt saves the 3 organ hunts — the alt only needs it to smash the Compelling Orb
Vendor shopping windows
Battle Staff of Teleportation — Normal Ormus (A3) · shop window: clvl 20–23 (usable at clvl 24) ≤19k gold, cheaper than the NM roll · recharge Chipped Gem + Ort
Wand of Lower Resistance — NM Drognan / Anya · shop window: clvl 30–35 (usable at clvl 36) cracks immunes · recharge Chipped Gem + Ort
Wand of Life Tap — Hell Akara / Drognan · clvl 65+ Uber sustain: 50% of damage dealt returns as life · recharge Chipped Gem + Ort
Runewords
Runeword bases: ≤3-socket (Lore helm, Stealth body, Ancient's Pledge/Rhyme shield) — vendor-shop Charsi/Akara (A1) or Fara/Drognan (A2), refresh inventory Normal A1–A2 sell non-magic sockets; A3+ vendors = magic only · 4-os (Insight polearm, Spirit Monarch) isn't vendor-buyable — Larzuk socket quest or Cube recipe
Spirit Sword base: Normal Cow Level farm for 4-os Crystal Sword (best base-drop rate), or NM Larzuk on a white Broad Sword (max 4 sockets) Monarch shield is Hell-only — comes later
Spirit Sword (Tal+Thul+Ort+Amn) — one per caster Rhyme or Ancient's Pledge as off-hand until the Hell Spirit Monarch
Insight on a 4-os polearm for the A2 merc (Ral+Tir+Tal+Sol)
Lore helm (Ort+Sol)
Stealth body armor (Tal+Eth) FCR + FRW, lasts until Smoke/Treachery
Ancient's Pledge shield (Ral+Ort+Tal) — bridge until Spirit Monarch
Spirit Monarch — find a white Monarch in Hell → Hell Larzuk → 4 sockets → Tal+Thul+Ort+Amn
Phase 2 · Endgame Charm Hunt
Cold Sunder for the Sorc — Latent tier is the realistic target, Renewed is rare-chase. Black Cleft grand charm for the Warlock. Both drop from any monster via Magic Find in a good Hell TZ; Heralds are a higher-chance source.
❄ SorcIdentify favorable Hell TZs (avoid cold-immune-heavy zones) — MF + density is the baseline farm
❄ SorcDrop a Cold Sunder ↻ chase, primary endgame goal
☥ LockDrop a Magic Sunder ↻ chase, Warlock endgame goal
Phase 3 · Budget Smiter Alt
One Smite Paladin alt for Ubers + Colossal Ancients. Every piece cheap — no Grief / Last Wish / CoH. Crushing Blow is what matters.
Leveling walkthrough
✦ Smiter
Level as Hammerdin; respec to Smiter once clvl + Core gear are Uber-ready. Sorc rushes through Normal/NM; Pala fights from Hell. 2-player, no bumper.
✦ SmiterRoll Paladin, level as Hammerdin. Stat: str for gear, rest vita (dex later for block). Blessed Hammer + Concentration maxed + prereqs, Vigor, 1pt Holy Shield guides: Paladin leveling · Smiter endgame
✦ SmiterNormal rush A1→A5. Important Quests: Den +1 skill · Horadric Cube · Radament +1 skill · Lam Esen's Tome (A3 → Alkor) +5 stat · Golden Bird (A3 → Alkor) +20 life · Izual +2 skill
✦ SmiterLevel Pala to clvl 24: Tristram → ~14 → A2 Tombs → ~20 → Cows/Travincal → ~24 shop Normal Ormus for a Teleport staff (clvl 20–23 window)
✦ SmiterNormal Ancients → Baal. Equip Spirit Sword + Spirit shield + Stealth + Lore (party forges)
✦ SmiterLevel to clvl 40: Normal Baal runs
✦ SmiterNM rush A1→A5. Important Quests: Den (+ Akara respec) · Radament · Lam Esen · Golden Bird · Izual · Anya +10 res · NM Hellforge
✦ SmiterLevel to clvl 75: NM Terror Zones to ~60 (NM Baal is a fixed ~mlvl 60 — out-leveled by the 60s), then Sorc power-levels you in Hell Chaos / Diablo 60→75 unlock NM TZ via the s6 NM-rush Baal kill · pre-Hell: 75% res (bank NM Anya + Smoke / P.Diamond shield), life ≥ 1.5k
✦ SmiterHell rush A1→A5. Important Quests: Den · Lam Esen · Golden Bird · Izual · Anya · Hell Hellforge shop Hell Akara/Drognan for a Life Tap wand (clvl 65+)
✦ SmiterLevel to clvl ~85, assemble Core gear: Hell Chaos / Baal throne / Cow
✦ SmiterRespec to Smiter at clvl ~85+ with Core gear. Max order: Resist Lightning → Fanaticism → Holy Shield → Smite (each 20). 1pt: Cleansing, Vigor, Salvation, Charge, prereqs Resist Lightning first — Uber Meph Conviction
Core gear — all cheap
✦ SmiterBlack runeword in 3-os flail (Thul+Io+Nef) 40% CB, 15% IAS · alt: Heaven's Light scepter (33% CB + +2–3 pal skills + 20% IAS, req clvl 61 / 125 str — CB tally 93% w/ Guillaume's + Goblin Toe)
✦ SmiterSpirit in a 4-os paladin shield — +2 all skills + FCR + 55 FHR + 22 vit + res no CBF · alts: Rhyme (free CBF + 25 res, frees a ring slot) · 4× P.Diamond paladin shield (+76 res) · upgrade: Herald of Zakarum
✦ SmiterGuillaume's Face helm — socket Shael rune (20% IAS → 10-fpa Smite) alts: Rockstopper (PDR + all res, more defensive), rare Resistance Mask (3-os helm + 3 P.Diamonds + res jewel) · helm jewel alt: 15/40 IAS+ED or P.Ruby (+38 life)
✦ SmiterLaying of Hands gloves +350% vs Demons + 20% IAS · fallback Bloodfist (FHR/life/IAS)
✦ SmiterGoblin Toe boots 25% CB, req clvl 22
✦ SmiterArmor — Smoke (Nef+Lum, +50 all res) primary · keep Treachery (Shael+Thul+Lem) swap-only: at A4 River of Flame proc Fade (≈60% all res, 288s), swap to Smoke, enter the Uber portal with both stacked
✦ SmiterCrafted Blood Belt (magic belt + P.Ruby + Tal + jewel) — has Open Wounds + life leech + life. This is your OW source · alt while cubing: rare belt with life+res or String of Ears
✦ SmiterHighlord's Wrath amulet alts: Safety Crafted Amulet (magic amulet + P.Emerald + Hel + jewel = DR%), Prismatic rare amulet (+all res prefix), Cat's Eye (dex+IAS+FRW), Eye of Etlich (+1 skills+leech), Atma's Scarab (Amp proc)
✦ SmiterRings: Raven Frost (CBF + dex + AR) + crafted Blood (leech + AR + life) alts: Wisp Projector (light absorb vs Uber Meph) · Bul-Kathos' · rare leech+AR+res · Rhyme shield frees both ring slots
Crushing Blow tally (target ≥ 80%)
✦ SmiterBlack flail 40 + Guillaume's 35 + Goblin Toe 25 = 100% CB ✓
Stat checks before Ubers
✦ Smiter75% block via dex + Holy Shield
✦ SmiterResists vs Uber Meph Conviction — count total fire / cold / lightning resist, before the Hell penalty:
· 300 total post-Fade → 300 − 100 (Hell) − 125 (lvl 20 Conviction) = 75% effective
· 240 total pre-Fade — Fade adds ≈60, which tops it up to 300
· Poison 75% (Conviction doesn't apply)
· 300 total post-Fade → 300 − 100 (Hell) − 125 (lvl 20 Conviction) = 75% effective
· 240 total pre-Fade — Fade adds ≈60, which tops it up to 300
· Poison 75% (Conviction doesn't apply)
✦ Smiter2k+ life · sustain via Life Tap (wand charges return 50% of damage dealt as life)
Phase 4 · Key Farming
3 of each key per Torch attempt. Separate games for throughput. Repeat as needed.
Setup
❄ SorcWPs unlocked: A1 Black Marsh + A2 Arcane Sanctuary
☥ LockWP unlocked: A5 Halls of Pain
☥ LockHell Anya rescued (Nihla quest active)
☥ LockNihla-ready: endgame Abyss (clvl ~85+), 75% res — fire-priority (Nihlathak's Corpse Explosion is ½ fire), Teleport Staff to rush Halls of Vaught, enough Abyss burst to drop him before CE chains clear the Witch pack first · never fight on corpses
Key drops (need 3 of each per Torch run)
❄ Sorc3× Key of Terror (Countess)
❄ Sorc3× Key of Hate (Summoner)
☥ Lock3× Key of Destruction (Nihlathak)
Phase 5 · Uber Tristram
⚔ PartyCube 3x3 Keys → 3 mini-Uber portals MOVE 1-2 screens between each cube — portals on the same spot overlap and become unclickable
✦ SmiterMatron's Den (Lilith / Uber Andariel) → Diablo's Horn
✦ SmiterFurnace of Pain (Izual) → Mephisto's Brain most dangerous mini — kill him first when farming
✦ SmiterForgotten Sands (Duriel) → Baal's Eye
⚔ PartyCube 3 organs in Harrogath → Pandemonium portal
✦ SmiterPre-cast Life Tap from wand on each pack (recharge Ort+chipped after)
✦ SmiterIsolate one boss at a time · burst Uber Meph first (lightning + curse) use the corners to peel
❄ SorcOptional — teleport-taxi the Smiter to the mini-Uber portals; otherwise stay out of the fight
⚔ PartyFirst Torch obtained ↻ re-run for class rolls
❄ SorcSorc Torch
☥ LockWarlock Torch
✦ SmiterPaladin Torch
Phase 6 · Colossal Ancients
5 statues from terrorized act bosses → cube in A5 Hell → fight 3 Colossal Ancients → Colossal Jewel. Recommended clvl ≥ 85 · Smiter with full Uber gear handles them; non-demons so LoH is wasted (swap to res/Bloodfist alt).
Statue farm (boss in Terror Zone)
⚔ PartyTalic's Anguish from Andariel ↻
⚔ PartyKorlic's Pain from Duriel ↻
⚔ PartyMadawc's Ire from Mephisto ↻
⚔ PartyBul-Kathos' Nightmare from Diablo ↻
⚔ PartyWorusk's End from Baal ↻
⚔ PartyBurn Worldstone Shards to force-terrorize an act when waiting
The fight
⚔ PartyCube 5 statues in A5 Hell → portal
✦ SmiterSmiter brings full CB stack — same Uber gear works
⚔ PartyKill the 15 minions first, then focus Ancients one by one
⚔ PartyThe Ancient you kill LAST picks the jewel — plan the kill order (Talic=Fire · Korlic=Cold · Madawc=Lightning)
❄ SorcProtector's Frost — kill Korlic last +5–10% cold skill dmg · −5–10% enemy cold res · +XP/gold/MF
☥ LockGuardian's Light — kill Madawc last +5–10% magic skill dmg · −5–10% enemy magic res · +XP/gold/MF
Phase 7 · Long Tail
⚔ PartyAnnihilus
⚔ PartyHit level 90
⚔ PartyHit level 95
⚔ PartyHit level 99 (vanity)
Sorceress · Starter · 105 FCR — maxroll ↗
❄ SorcSpirit
❄ SorcSpirit Shield
❄ SorcLore
❄ SorcStealth
❄ SorcFCR amulet
❄ SorcMerc (Act 2 Might): Insight · Bulwark · Smoke
Sorceress · Standard · 105 FCR — maxroll ↗
❄ SorcDeath's Fathom
❄ SorcSpirit Shield
❄ SorcNightwing's Veil
❄ SorcOrmus' Robes
❄ SorcTrang-Oul's Claws
❄ SorcArachnid Mesh
❄ SorcMara's Kaleidoscope
❄ Sorc2× Stone of Jordan
❄ SorcRenewed Cold Rupture
❄ SorcMerc (Act 2 Might): Infinity (Giant Thresher) · Andariel's Visage · Fortitude
Warlock · Starter · 75 FCR — maxroll ↗
☥ LockSpirit
☥ LockSpirit Shield
☥ LockStealth
☥ LockLore
☥ LockFCR amulet
☥ LockFCR rings
☥ Lockcrafted caster belt
☥ LockMerc (Act 2 Might): Insight · Bulwark · Treachery
Warlock · Standard · 125 FCR — maxroll ↗
☥ LockVoid
☥ LockArs Dul'Mephistos
☥ LockShako
☥ LockEnigma
☥ LockMara's Kaleidoscope
☥ LockTrang-Oul's Claws
☥ Lockrare FCR rings
☥ LockArachnid Mesh
☥ LockWraithstep
☥ LockRenewed Black Cleft
☥ LockGheed's Fortune
☥ LockMerc (Act 2 Might): Breath of the Dying · Andariel's Visage · Fortitude
Player Count
Optimal /players X
Why it varies: player count shrinks the NoDrop chance (the "nothing dropped" slot), it does not improve item quality.
Once a target's NoDrop already sits at 0, more players buys nothing but tougher monsters.
Solo setting ≠ online headcount: only odd settings do anything (P2 = P1, P4 = P3, P6 = P5, P8 = P7), because a nearby partied player counts double an unpartied one. /players 3 = 2 partied · /players 5 = 3 partied · /players 7 = 4 partied. Our 2-player party therefore sits permanently at the P3 breakpoint and can never reach the P5 one.
Why the gain differs per target and per item: every treasure class carries its own NoDrop and its own pick count, so the same P-step is worth ×1.19 on Mephisto and ×1.63 on a regular monster. Within one target, common items saturate across picks while rare ones stay linear (Countess Ist stops gaining at P5, Vex still gains at P7).
Numbers below measured on dropcalc.silospen.com (RotW 3.0, Hell, party 1); multipliers are total drop odds vs P1 at P3 / P5 / P7.
Solo setting ≠ online headcount: only odd settings do anything (P2 = P1, P4 = P3, P6 = P5, P8 = P7), because a nearby partied player counts double an unpartied one. /players 3 = 2 partied · /players 5 = 3 partied · /players 7 = 4 partied. Our 2-player party therefore sits permanently at the P3 breakpoint and can never reach the P5 one.
Why the gain differs per target and per item: every treasure class carries its own NoDrop and its own pick count, so the same P-step is worth ×1.19 on Mephisto and ×1.63 on a regular monster. Within one target, common items saturate across picks while rare ones stay linear (Countess Ist stops gaining at P5, Vex still gains at P7).
Numbers below measured on dropcalc.silospen.com (RotW 3.0, Hell, party 1); multipliers are total drop odds vs P1 at P3 / P5 / P7.
| Target | Sweet spot | P5 → P7 benefit? | Notes |
|---|---|---|---|
| Andariel | P7 | Yes | ×1.48 / ×1.65 / ×1.79 — steepest scaling of any act boss |
| Duriel | P5 | Marginal | ×1.27 / ×1.35 / ×1.37 — P5 → P7 is only +2% |
| Mephisto | P5 | No | ×1.19 / ×1.22 / ×1.22 — NoDrop already 0 at P5 |
| Diablo | P5 | No | ×1.19 / ×1.22 / ×1.22 — same table as Mephisto |
| Baal | P5 | No | ×1.19 / ×1.22 / ×1.22 — same table as Mephisto |
| Countess — key | P5 | No | 1 key per 14 / 11 / 10.4 / 10.2 runs at P1 / P3 / P5 / P7 · 33 runs at P3 for the 3 you need |
| Summoner — key | P7 | Marginal | 1 key per 11.6 / 8.6 / 8.0 / 7.8 runs · 26 runs at P3 for 3 |
| Nihlathak — key | P7 | Marginal | 1 key per 12.6 / 9.6 / 9.0 / 8.8 runs · 29 runs at P3 for 3 |
| Countess — runes | P5 | No | ×1.23 / ×1.31 / ×1.31 — her rune TC has its own NoDrop, so runes do improve; caps at P5 |
| Pindleskin | P1 | No | NoDrop already 0 — identical yield at every setting |
| Eldritch | P1 | No | Same |
| Shenk | P1 | No | Same |
| Thresh Socket | P1 | No | Same |
| The Summoner — general loot | P7 | Marginal | ×1.37 / ×1.47 / ×1.51 — same TC as his key, so his loot scales too |
| Nihlathak — general loot | P7 | Marginal | ×1.33 / ×1.42 / ×1.45 — same TC as his key |
| Travincal Council | P5 | Marginal | ×1.38 / ×1.49 / ×1.53, identical for all three — big P1 → P3 jump, +8% to P5, +3% to P7 |
| Cow King | P1 | No | NoDrop already 0 |
| Regular Unique monsters | P1 | No | Their drop TC has NoDrop 0 — flat at every setting |
| Champions | P1 | No | Same principle |
| Regular monsters / cows | P7 | Yes | ×1.63 / ×2.03 / ×2.29 — by far the biggest payoff |
| Elite-packed zones (Pit, Chaos, …) | P7 | Yes | You're farming large numbers of regular monsters |
Horking
| Setting | Kill drops | Hork drops | Practical effect |
|---|---|---|---|
| P1 | Lowest | Same as P7 hork | Fastest |
| P3 | Better | Same | Often excellent |
| P5 | Better | Same | Usually little reason |
| P7 | Best kill drops | Same | Only worthwhile if kills stay fast |
Find Item ignores player count entirely — hork yield is flat, so the only question is whether the extra kill drops are worth the slower clear.
Cheatsheet
Map Directions
How to read this:
"
Source: Michaelangel007 — Map Reading.
L1 · L2 · L3" = dungeon Level 1 / 2 / 3.
Direction words (left, straight, right, "wp→X" = from the waypoint go X) point to where the next exit / stairs / objective sit relative to where you enter the area.
red = no consistent direction, read the minimap.
Source: Michaelangel007 — Map Reading.
Act 1
- Blood Moor · Cold Plains · Stony Field · Dark Wood · Black Marsh · Tamoe Highland — follow path
- Tristram cairns — on path
- Tower Cellar L1·L2·L3·L4 — all LEFT
- Underground Passage — right
- Barracks — left or straight
- Jail L1 · Jail L2 — straight (wp on left in L1)
- Jail L3 · Inner Cloister — left
- Cathedral — right
- Catacombs L2 — wp → right
Act 2 · Lut Gholein
- Sewers L1 — chest → right
- Sewers L2 — wp → straight
- Sewers L3 (Radament) — left
- Stony Tomb L1 — left · L2 — chest, boss center
- Halls of the Dead 1 · 2 · 3 (Cube) — all LEFT · L2 wp center
- Maggot Lair 1 · 2 — right · L3 — straight
- Ancient Tunnels — chest left
- Claw Viper Temple L1 — left
- Tal Rasha's Tomb — orifice on left
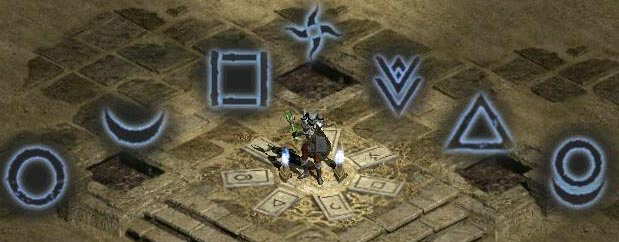
Tal Rasha's true-tomb symbols — match the amulet glyph
Act 3 · Kurast
- Spider Forest · Spider Cavern (Eye) — left bias typical
- Swampy Pit L1 · L2 — left
- Flayer Dungeon L1 · L2 (Brain + Gidbinn) — left
- Kurast Sewers L1 — chest → right
- Travincal — Compelling Orb at center, gate behind
- Durance of Hate 1 — left
- Durance L2 — wp → straight · from WP go left to L3
Act 5 · Harrogath
- Crystalline Passage — left · split S → Frozen River (Anya) · wp on right
- Glacial Trail — left · wp on right
- The Ancients' Way — left
- Halls of Anguish · Pain · Vaught (Nihlathak) — follow the 2 red eyes on minimap
- Worldstone Keep L2 — wp → right
- WSK 1 · 3 — random rotation
Breakpoints
❄ Sorc FCR — Cold / Fire / Teleport
| FCR % | Frames |
|---|---|
| 0 | 13 |
| 9 | 12 |
| 20 | 11 |
| 37 | 10 |
| 63 | 9 |
| 105 | 8 |
| 200 | 7 |
Targets: 63% (9-frame Teleport/Blizzard), 105% for top-end.
❄ Sorc FCR — Lightning (Nova, CL, CB)
| FCR % | Frames |
|---|---|
| 0 | 23 |
| 7 | 22 |
| 15 | 21 |
| 23 | 20 |
| 35 | 19 |
| 52 | 18 |
| 78 | 17 |
| 117 | 16 |
| 194 | 15 |
Applies during the Nova-leveling phase (clvl 12–25).
☥ Lock FCR
| FCR % | Frames |
|---|---|
| 0 | 15 |
| 9 | 14 |
| 18 | 13 |
| 30 | 12 |
| 48 | 11 |
| 75 | 10 |
| 125 | 9 |
Same table as Paladin / Necromancer human form (per Michaelangel007).
✦ Smiter IAS — Smite (1H weapon class 0, e.g. flail)
| IAS % | Frames |
|---|---|
| 0 | 9 |
| 9 | 8 |
| 26 | 7 |
| 60 | 6 |
| 152 | 5 |
Black 15 + LoH 20 + Highlord 20 = 55% → 7 fpa · need 60+ for 6 fpa.
✦ Smiter FBR (Holy Shield active) / FHR
| FBR% | Block | FHR% | Recover |
|---|---|---|---|
| 0 | 5 | 0 | 9 |
| 9 | 4 | 7 | 8 |
| 20 | 3 | 15 | 7 |
| 42 | 2 | 27 | 6 |
| 86 | 1 | 48 | 5 |
| — | — | 86 | 4 |
Block: 75% via dex + Holy Shield. Spirit = +55 FHR, no FBR. Rhyme alt = 40 FBR + CBF.
Late-game Cube Recipes
-
Add sockets — WeaponRal + Amn + P.Amethyst + normal weapon1–6 sockets, up to item-type max
-
Add sockets — Body ArmorTal + Thul + P.Topaz + normal armor1–4 sockets
-
Add sockets — HelmRal + Thul + P.Sapphire + normal helm1–3 sockets
-
Add sockets — ShieldTal + Amn + P.Ruby + normal shield1–4 sockets
-
UnsocketHel + Town Portal scroll + socketed itempreserves base, destroys runes/gems inside
-
Reroll Magic Grand Charm3 P.Gems + magic GCfish for skiller mods
-
Reroll Rare Item6 P.Skulls + rare itemnew rare, same item type
-
Upgrade Unique WeaponNorm → ExcRal + Sol + P.Emerald + itemExc → EliteLum + Pul + P.Emerald + item
-
Upgrade Unique ArmorNorm → ExcTal + Shael + P.Diamond + itemExc → EliteKo + Lem + P.Diamond + item
-
Token of Absolution (one respec)Twisted Essence + Charged Essence + Burning Essence + Festering Essencefrom Hell Andy/Duriel · Meph · Diablo · Baal respectively
Vendor Shopping — Staffs · Wands · Charges
Charges are an oskill — any class uses them on weapon-swap. Skill level & required level scale with the vendor's difficulty and your clvl, so buy inside the window. Re-roll vendor stock by leaving/re-entering town (or save & exit). Wand recharge: Ort + chipped gem + wand. Staff recharge: Ral + chipped gem + staff.
-
☥ Lock✦ SmiterBattle Staff of TeleportationVendorNormal Ormus (Act 3, staff vendor)Windowshop clvl 20–23 · equip clvl 24 · ≤ ~19k gold (cheaper than NM)RechargeRal + chipped gem + staff (or just re-buy)weapon-swap Teleport mobility (no Enigma needed)
-
❄ SorcWand of Lower ResistanceVendorNM Drognan (A2) / Anya (A5)Windowshop clvl 30–35 · equip ~clvl 36RechargeOrt + chipped gem + wand−enemy cold/all res — cracks cold-immunes before the Cold Sunder drops
-
✦ SmiterWand of Life TapNormalAkara (A1) / Drognan (A2) · shop clvl ~12–24 → Life Tap ~lvl 1–3HellAkara (A1) / Drognan (A2) · clvl 65+ → Life Tap lvl 4–5 (~90+ charges)Equipclvl 24 · recharge Ort + chipped gem + wandUber / Colossal sustain — curse the boss, ≈50% of damage dealt returns as life
Useful Crafts
Recipe pattern: magic base + perfect gem + rune + any jewel · re-roll until affixes hit
Craft ilvl = int(clvl / 2) + int(base ilvl / 2) — your own level counts for half of it, so craft on your highest character. ilvl 71+ guarantees all 4 bonus affixes. Base ilvl below assumes clvl 90.
Base ilvl sources: gambled = clvl −5 to clvl +4 · Terror Zone drop = clvl +2 · normal Hell drop = area level (Baal throne 85).
Craft ilvl = int(clvl / 2) + int(base ilvl / 2) — your own level counts for half of it, so craft on your highest character. ilvl 71+ guarantees all 4 bonus affixes. Base ilvl below assumes clvl 90.
Base ilvl sources: gambled = clvl −5 to clvl +4 · Terror Zone drop = clvl +2 · normal Hell drop = area level (Baal throne 85).
-
❄ Sorc☥ LockCaster AmuletBaseany magic amulet · ilvl 90+ilvlcraft ilvl 90 unlocks the +2 class skills prefixSourceTZ drop at clvl 90+ · gamble at clvl 93+ · any Hell Baal (mlvl 99) or Nihlathak (95) dropRecipe+ P.Amethyst + Ral + jewelauto +10% FCR + bonus FCR roll
-
❄ Sorc☥ LockCaster RingBaseany magic ring · ilvl 52+Recipe+ P.Amethyst + Amn + jewel1–10% FCR + mana/life
-
❄ Sorc☥ LockCaster GlovesBasemagic Leather Gloves / Demonhide Gloves / Bramble Mitts · ilvl 52+Recipe+ P.Amethyst + Ort + jewel+20% FCR
-
❄ Sorc☥ LockCaster BeltBasemagic Light Belt / Sharkskin Belt / Vampirefang Belt · ilvl 52+Recipe+ P.Amethyst + Ith + jewelFCR + mana
-
✦ SmiterBlood RingBaseany magic ring · ilvl 52+Recipe+ P.Ruby + Sol + jewel1–10% life leech + AR + life · 2nd ring slot
-
✦ SmiterBlood GlovesBasemagic Heavy Gloves / Sharkskin Gloves / Vampirebone Gloves · ilvl 52+Recipe+ P.Ruby + Nef + jewellife leech + IAS · LoH fallback (no Demon bonus)
-
✦ SmiterBlood BeltBasemagic Belt / Mesh Belt / Mithril Coil · ilvl 52+Recipe+ P.Ruby + Tal + jewelOpen Wounds + life leech + life · the Smiter's OW source